Lend Library : user guide
Version 2024.1
Lend Library is hosted (cloud) software for managing lending libraries;
Everything is online, available through a web browser. There are two main parts to the system
-
The admin area for creating and managing items, members and loans.
-
The member website (public website) where members can see your items and manage their account. This can be private if required.
Lending overview
Staff and users
Sites, locations and opening hours
Multi-site
Loan settings
Reservation fee
Payment for reserved items
Members and Memberships
Membership types
Discount
Credit limits
Maximum number of items on loan
Emails & templates
Member site (public website)
Pages and menu links
Translation / language
Customising the site
Items
Check in and check out prompts
Contacts and members
Membership numbers
Attachments and notes, and donated items
Mailchimp integration
Contact custom fields
GDPR / removing contact information
Fees, payments and balances
Payment methods
Refunds
Fees
Libraries who don’t charge a fee
Taking payments by card
Lending processes
Lending an item out (or reserving an item) as staff or administrator
Checking an item back in
Extending a loan
Adding an extra fee
Deposits
Self serve
Waiting list
Postal loans
Shipping fees
Shipping address
Printable loan
Automation
Loan return reminders
Reservation reminders
Overdue notifications
Membership expiry
Events
Event listing
Attendees / selling tickets online
Checking in
Kits
Setting up
Lending a kit
Components where multiple group items exist
Swapping kit components
Stock items / consumables
Setting up
Selling an item as part of a new loan
Adding items to a previously created reservation
Updating inventory
How to sell an item that’s currently on loan
Services
Maintenance and servicing
Introduction
Assigning maintenance to items
Scheduling maintenance
Performing the maintenance
Other features
Reporting
Billing and subscription
About billing
White labelling
Lending overview
 |
 |
 |
 |
Staff and users
When you create your Lend Library account, you will be added as an administrator, which gives you access to all the settings, and also the ability to add more staff members. To add further team members, visit Settings » Staff / team.
There are three levels of access, the first two are managed in the team settings screen:
-
Administrator; can edit settings and manage other staff
-
Staff; can create and edit items, members and loans, as well as perform day-to-day tasks like checking items in or out, perform maintenance or service. Cannot bulk export data.
-
User; a contact or member who can log in to your member site. You can have people on your database who cannot log in to your member site; manage who can and who can’t on the specific user edit screen.
If you are logged in as an administrator or staff member, you will get an extra toolbox when browsing the member site:
 |
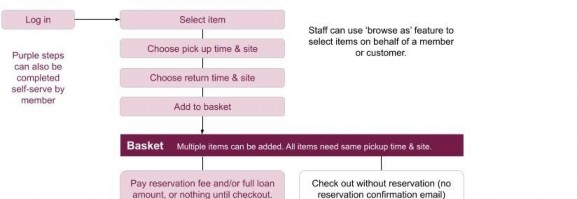
This lets you search for members or loans, and most importantly allows you to “browse as” a member, when you want to create a loan for them, or take payment from them. Note that you still see the admin view of items (where you can borrow items which may not be borrowable if you were logged in directly as a member, for example).
If you want to see the member’s view of the public site, create a new user account with a different email address from your admin email, and use a different browser (not a new tab). So if you’re using Firefox for your admin work, use Internet Explorer, Chrome or Safari to see what a member would see.
Tip: If you use Gmail, you can create a new email address which sends to your regular email using a “+”; such as my.name+member@gmail.com
Sites, locations and opening hours
The first thing you need to set up after creating your account is your site(s) and opening hours.
A site is a physical location with an address, such as a building, warehouse or shop front. Within a site, you can have locations, which could be shelf numbers, rooms or boxes. Loan items and inventory items are always stored in a location, unless they are on loan [which is in fact a dedicated location called ‘on loan’ which you cannot edit or remove].
A site has opening hours (a “time slot”), which determine when an item can be borrowed. When a user wants to reserve or borrow an item, they choose a slot for pickup and a slot for returning.
Opening hours can be a regular time each week; set these when you edit the site, or they can be ad-hoc for one-off sessions. You can also use ad-hoc sessions to prevent use of a regular weekly opening time if you are closed for a holiday. Regular opening hours must be set in 24 hour format; such as “0900” for 9 am or “1630” for 4.30 pm.
Ad-hoc opening hours can be extended to create events, which have more detail and can accept bookings. Manage events through the events menu.
Every site has a default check in location (set on the site edit screen).
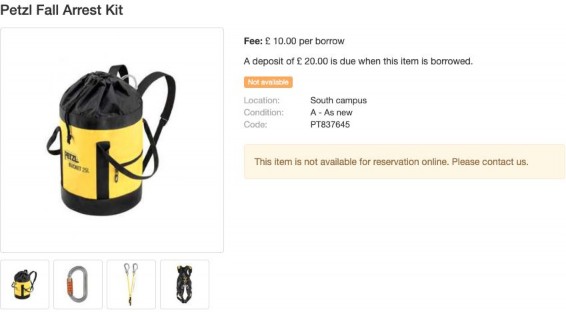
Locations can be “available” or “not available”. If items are in a not-available location, then they cannot be added to loans or checked out (though they could still be visible on the member site). Perhaps an item has been returned which is damaged, and you don’t want people to borrow it. This is what’s shown to members online (however, admins can still lend the item):
 |
Multi-site
Lend Library can operate in a powerful, multi-site mode. All you need to do is add sites (for which you’ll need to be on Plus or Business plan). When you have more than one site, these extra features are possible:
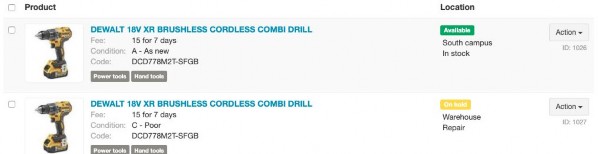
Items can be restricted to sites, such that they can only be checked in to the sites allowed for that item:
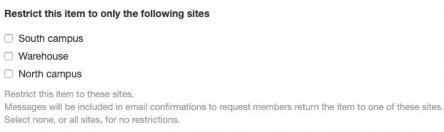 |
Report on items that need moving from one site to another, based on upcoming reservations. Here we have a reservation for an item which will be picked up from South Campus site, but is currently at Warehouse:
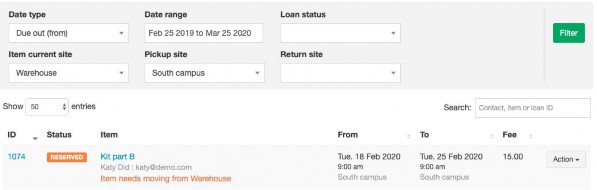 |
When operating in multi site mode, administrators are given the choice of choosing a “working site” when they log in or visit the admin dashboard. This working site is used to determine the default check-in location, so they don’t need to choose it each time an item is returned:
 |
Users can also filter the item listing online, to show only items in a chosen site.
Loan settings
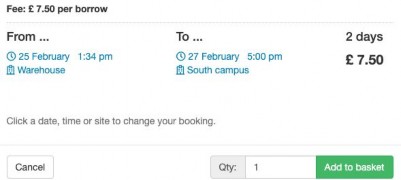
The time that an item can be reserved for is determined by your site opening hours, since reservations are created using the calendar. An item must be picked up from a site during an opening time, and returned to a site during an opening time.
An exception to this is starting a reservation or loan “now” if you are logged in as an administrator, for the situation where you have an item in your hand and you might not be at a site during opening hours.
A maximum and/or minimum number of days can be set [Settings » Loans & reservations], which applies only to members creating self-serve reservations online. Administrators are not bound to maximum and minimum times.
If you charge to lend items, you can charge on a daily basis, or a per-loan basis. Administrators can change the amounts and fees on most screens. Members performing self-serve actions cannot change the fees.
Charging per day / week / month
If you charge £5 per week, then set your “normal borrowing fee” in settings to :
This fee structure assumes that your opening hours are one week apart, which forces the loan to be 7 days. Alternatively, you can also set a minimum loan period of 7 days. Currently there is no mechanism to force members to borrow in 7-day chunks, if perhaps they wanted to borrow for 14 or 21 days at a multiple of £5 (but it’s something we’re assessing).
Charging per borrow
If you just charge a fixed fee for a borrow, regardless of the length, then choose “yes” for prices are fixed per borrow at Settings » Loans & reservations.
Late fees
Enter a per-day late fee in settings to charge members who are checking an item back in after the due date. Admins can override the fee if required, during the check in process.
Reservation fee
You can choose to charge a reservation fee (which, like other fees, can be changed or removed by admin on a per-loan basis if you need). This would be charged to the member account when a reservation is placed online, either by them or by an admin. If the member has no credit limit (ie
their account balance cannot go below zero) then payment must be taken when the reservation is placed.
Payment for reserved items
You can choose whether the full loan fee is due when items are reserved, or when the loan is checked out later. This setting is independent of the reservation fee, which would always be charged when the items are reserved.
If the member does not have a credit limit, then payment must be taken when the amount is charged.
Members and Memberships
Contacts can exist on your system without being members. Perhaps you might want to store details of contractors, instructors, workers, or even item donors. Only when a contact has an active membership do they become members. An alternative name for active membership could be ‘subscription’. It has a start date and an end date.
Only members can borrow items, or buy consumables (stock items).
Membership types
In order to create a membership, you (or a logged in user) must choose from a membership type. You can have as many membership types as you want. Typical types might be “temporary member” or “premium member”.
If you would like users to register online, and choose a membership during the self-serve registration process, then set “allow users registering online to choose this” to yes.
Membership types can be free, or paid. Self serve membership types which are not free require payment to be taken online during the sign up process, which requires the Stripe payment integration to be turned on. The exception to this is when you are processing the membership as an administrator, when you can choose the payment method, or edit the subscription amount.
Create your membership types at Settings » Membership types.
Discount
If you set a discount percentage for a membership type, then these members will have the discount applied to all loan fees and event ticket fees. Late return fees and payment fees are not discounted.
Credit limits
“Credit” is the ability for a member account balance to go below zero.
A credit limit of 0 (zero) will prevent users from borrowing items if they don’t have an account balance. This will require them to make a payment each time something is borrowed. This applies to admins as well; you would need to take payment for users with no credit limits.
A credit limit of blank means that they can borrow without having money on account.
Maximum number of items on loan
Some libraries like to set a maximum number of items on loan to any one member. Use the setting on the membership type to control this.
Emails & templates
Lend Library sends emails to members when various actions happen, such as creating a reservation, checking an item out, and so on. The main body of these emails is created by the system, but you can configure the subject line, and add header/footer content (not on all pay plans).
Edit your email templates at Settings » Email templates.
Emails are sent “from” a Lend Library email address, with the “reply-to” being your organisation email address. This is to reduce the likelihood of the emails being marked as spam; we cannot send emails “from” you without access to your email servers, for obvious reasons.
At Settings » General settings you can choose “send a copy of customer emails to my organisation email” to get a feel for what’s being sent out:
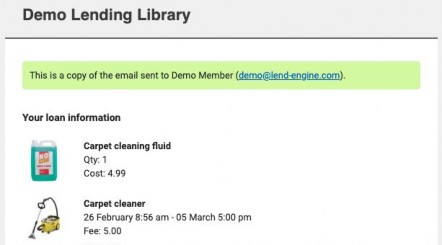 |
For transactional emails (such as loan confirmations and maintenance notifications), a green button is added into the email which allows the member to access their account with one click; no need for them to log in.
Member site (public website)
Every Lend Library account comes with a website to show your items online.
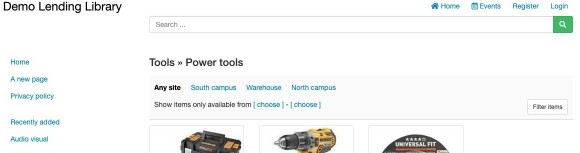 |
 |
Registration and access
You can set your member site to show items to everyone who visits the site, or just show items to logged in users (Settings » Member site). Only logged in users can create self-serve loans or reservations.
You can also choose whether people can register online to become a user, or whether new users have to be created by an administrator.
Regardless of how they are created, users may or may not be given access to the logged in areas of the website, depending on whether they are “enabled” or not. Enable users by ticking the “can log in to Lend Library public site” checkbox on the contact edit screen. Logged in areas include the user’s profile, their loan history, and payment history.
If you have site registration turned on, the standard registration flow is as follows:
-
Fill out registration form
-
Choose membership type
-
Pay (if required)
-
Done
A welcome email is sent when they have filled out the registration form.
Alternatively, you can require that the user must confirm their email address before they can subscribe to a membership:
-
Fill out registration form
-
Click confirmation link in welcome email
-
Choose membership type
-
Pay (if required)
-
Done
Choose your registration and access settings at the bottom of Settings » Member site.
Pages and menu links
If you’re on the Starter plan or higher, you can add extra web pages to your member site, for things like a Privacy Policy, member information, or even staff guidelines for internal use only. Each page is set to one of three visibility options:
-
Public (anyone can view, even if not logged in)
-
Logged in users only
-
Staff only
To add pages, log in as an administrator, and from the admin toolbox on the member site, click “edit website”. You’ll then be given the option to add pages at the top of the left hand menu.
A “page” can also be just a link out to a separate website, if you want to link to your main Library site for example.
Many smaller libraries don’t have a separate website; with the Starter plan you can add pages and customise the theme to create a basic website all within the Lend Library system. If you want a custom domain name (such as https://www.my-Library.com) you can upgrade to the Plus plan.
Translation / language
The member site can be shown in a number of languages. Currently the choice is English, Icelandic, Romanian, Slovenian, Welsh, French, German, Spanish and Dutch. When a user registers, they can choose the language that they view the site in. At Settings » Member site, you choose the default language.
If your Library needs a language that’s not on the list and you’re happy to do a little translation work, please get in touch!
Customising the site
At Settings » Member site, you can add custom CSS or Javascript to make small changes to the look and feel of your website. You’ll need a basic level of HTML and CSS coding to do this. Typically, it would be used to change the colour scheme, rather than to change the layout.
Lend Library item listings cannot be embedded into other websites. We used to have the functionality, but it was not used enough to justify the development and support costs at the time. Most libraries link from their main website to the Lend Library item listing site, and often have a custom domain as well.
Items
There are three kinds of item:
-
Loan items
-
Stock items (consumables)
-
Kits
Once you’ve created an item, you can’t change the type. The one exception to this rule: you can change a loan item to a stock item if a member wants to buy the item they have on loan. Do this from the loan check in screen.
This help section applies to loan items. For more details on consumables and kits, see later sections in this guide.
Items can be created in three ways:
-
Using the “add item” screen
-
Copying another item
-
Importing from a spreadsheet
The add item screen is used the most. From the left menu in admin, click Items and choose which kind of item you would like to create. You’re taken to a screen where you then need to choose the “item type” which is used for internal purposes within the Lend Library network - to see what kind of items are being lent. Your members never see this.
Once you’ve chosen an item type, fill out the other details for your item. Only the name field is mandatory.
Every loan item is a unique product, with an item ID assigned by Lend Library. Each item can only be in one location at any point in time; either one of your defined locations, or the system “on loan” location.
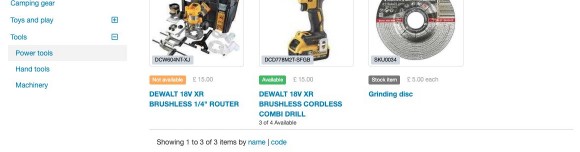
Many libraries have multiple items of the same type, often with the same name. These items can still be in different physical locations, and be in different conditions, so they are still separate loan items. To make it easier to manage similar items, Lend Library has a feature for “grouping items with the same name”; turn this on at Settings » Member site.
When item grouping is turned on, any changes you make to one of the items in the group will also be made to the other items, apart from the price paid, the code, the serial number and the item’s condition.
Here are four similar drills as shown in admin (note the different locations and conditions):
 |
 |
On the member site, when grouping is turned on, the drill is shown as “3 of 4 available” (one is in a reserved location; the warehouse repair location):
 |
And then when a loan or reservation is created, the user can choose how many they want to add:
 |
If you need to split an item out of a group:
-
Turn off the grouping setting.
-
Change the name of the item you want to split out.
-
Turn the grouping setting back on.
On the Plus or Business plan, you can create additional fields to capture more information about your items. You can create select lists (single or multiple choice), checkboxes, text areas or regular input fields. Here’s the item edit screen in admin:
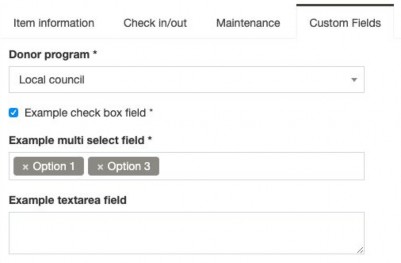 |
Some fields have been set to also show as extra information for members:
 |
 |
Check in and check out prompts
To help users (team members) perform the right processes when items are checked in or out, you can create check in prompts and check out prompts (Plus plan upwards). These will require the user to tick a box before checking the item in or out.
Different items can have different prompts, and items can have more than one prompt if needed. Here’s an example; the item being checked out requires the staff member to give the member a quick safety brief on the item’s use before checkout can complete:
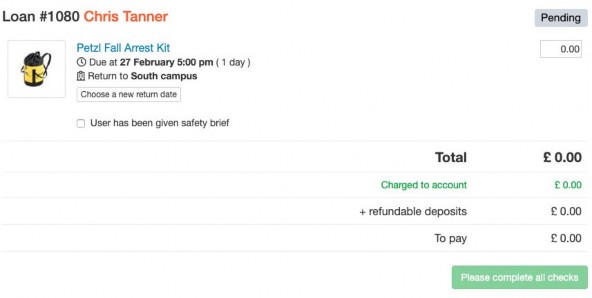 |
If you have enabled self serve checkout (where members can check items out without a staff member) they will need to complete the prompts in the same way.
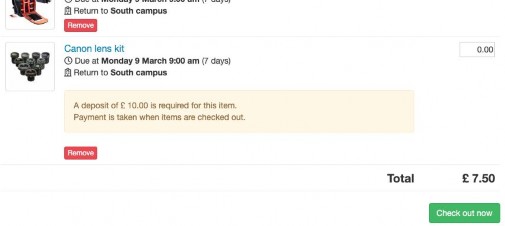
On the starter plan upwards, you can set items to require a deposit before they can be lent out (checked out). Set the deposit amount on a per-item basis when on the item edit screen. This is how it appears to the user:
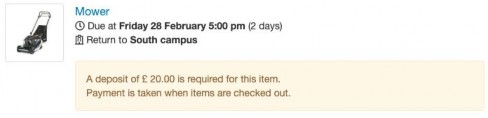 |
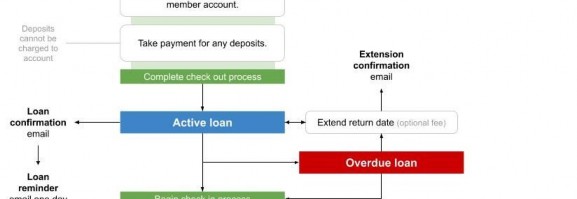
As an admin, you can edit the deposit amount before checking the item out. Deposits cannot be paid using account balance. A payment is needed. Deposits taken do not affect the member’s balance, since it is money put aside to refund later, not to be used for borrowing other items.
 |
When you check the item back in, you are given the option to refund the deposit. If the payment was taken originally via Stripe, then a refund is also made via Stripe.
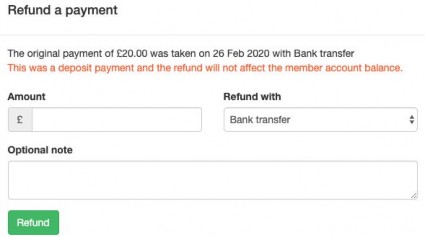 |
If you need to partially refund the deposit (perhaps the item was damaged), enter only the amount you want to refund. The rest of the deposit will stay on the system - so make sure you add a note so that other team members know the situation. Search the payments report for “deposit” and member to see what a deposit status is:
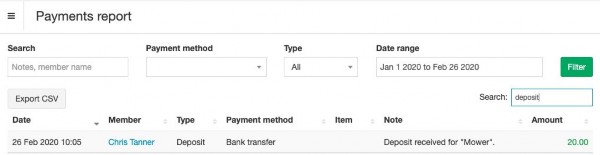 |
Every loan item must be in a specified location (which includes the system “on loan” location). Set up locations at Settings » Locations. Stock items (if you have more than one in stock) may be spread across multiple locations.
You can move a loan item from one place to another, as long as it’s not on loan. Click the “move / service” link which appears on various screens. If you’re moving the item into a repair location, you could also choose to create a maintenance task at the same time (if your plan has the maintenance feature enabled):
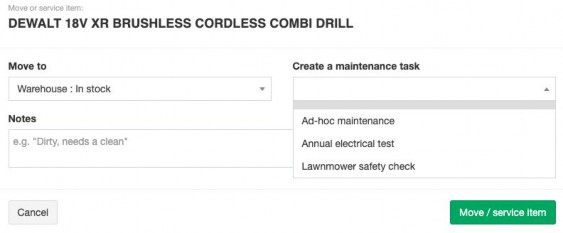 |
When an item is in an unavailable location (such as a repair location), it cannot be checked out.
On the Plus and Business plans, you can add attachments (upload files) to items. Each file must be less than 10Mb. Attachments are shown on the member site for users to download - the user must be logged in first. Great for user guides or manuals.
If you’d like to track who has donated items, you can select any existing contact from the “donated by” field on the right hand side of the item edit screen. Your donors don’t have to be members; remember you can add any of your organisation’s contacts into Lend Library so that you have a record of their information.
When one of their items is lent out, an email is sent to them. Update the email template (if you’re on a suitable pay plan) at Settings » Email templates.
On the Plus or Business plan, you can print barcode labels for items, to make it quicker to add items to loans when members are checking out. Turn label printing on at Settings » Item barcode labels, and then save settings to show more label options. Full instructions are shown on the settings screen.
The only supported printer is the Dymo LabelWriter (on Mac OSX and Windows). There are two supported label sizes: 19mm x 51mm and 19mm x 64mm. Choose the label size you want on the settings screen. A preview of the label will show on screen:
 |
The number printed as the barcode is the item ID. Also shown is the code (if there is one) if you want to type it in manually to a search field.
Contacts and members
Add anyone you like into your Lend Library system as contacts; they don’t have to be members. It’s handy to have all your information in one place. When a contact is subscribed to a membership, then they become a member and can borrow items.
Membership numbers
If you have membership numbers (perhaps generated by a membership card printing service) then you can enter the number on the contact edit screen. Contact search boxes will also look at this field (and if you scan member cards with a barcode reader, that will work too).
Attachments and notes, and donated items.
On Plus plan and above, you can attach files to contacts. Useful for liability waivers, any contracts signed, ID seen and so on.
Notes are added automatically to the contact record as you interact with them (lending items, taking payments). You can also add notes manually; and choose whether a note is visible to admins only; which means that staff would not be able to see the note.
Also on the contact screen you can see which items they have donated. Set a donor for an item on the item edit screen.
Mailchimp integration
Lend Library will push contacts into your Mailchimp account when they register via your Lend Library site. Just add your Mailchimp details into the Mailchimp section at Settings » General settings.
Mailchimp is a popular email marketing tool - see www.mailchimp.com
Contact custom fields
If you need to capture more information about a contact, you can create custom fields (if you’re on the Plus plan or above). Custom fields appear on the contact edit screen, and can also be set up to show on the contact list in admin, for an at-a-glance view.
If you want your team to capture mandatory information from a member, then you can set a field to be required. If the field is empty, you can’t save the contact or check out loans until the field is filled in:
GDPR / removing contact information
If you wish to remove the information you store about a contact, you can use the “Remove this contact” link on the contact edit screen. Loan and payment history will be retained, but the contact personal information will be removed and any information retained will be anonymous.
Fees, payments and balances
A fee is the way to record that a member needs to pay for something. A payment is when you receive money from a member. The sum of fees and payments add up to make the member balance.
|
Loan fee |
-$10 |
|
Payment |
+$10 |
|
Balance |
$0 |
The fee and the payment are separate transactions, so a member could borrow an item without having given you any money. Their balance would then be -$10. This could continue all the way up to their credit limit, which is defined by their membership type. By default, membership types have no credit limit. If you don’t want member balances to go below zero, set the credit limit to zero.
Payments can happen either during a workflow such as checking out a loan, or you can add money as a separate process. Consider “adding money” as topping up a bank account, which is then consumed as the user borrows items, or incurs other fees.
When you subscribe a member to paid membership, you would see a fee and then a payment. Both are recorded against the membership, and the resulting member balance is zero.
Payment methods
Set up as many payment methods as you need in the settings area. It’s handy to be able to see how each payment was taken. When you are taking payments as admin or staff, you can choose the payment method for each transaction. When a member is making payments (via self serve checkout, or adding money to their balance), they only get the choice of Stripe [which you can rename “Credit or debit card” if you want].
Refunds
When you’re giving money back to a member, find their payments list (on the contact edit screen) and choose the payment you would like to refund.
Fees
The following are fees :
-
Item fee on a loan; what it costs to borrow the item
-
Extension fees, charged when changing a loan date
-
Late return fees, charged when checking an item in
-
Membership fees, when subscribing to a membership
-
Miscellaneous fees, added by staff or admin to a loan
Add misc fees on the loan screen before the loan is checked in. The fee is charged immediately to the member account (if you need to take payment for the fee, you can do it as part of the checkout process. If the loan has already been paid for, then you would need to use the “add money” workflow. Here a member has been charged £1 for damage to the mower:
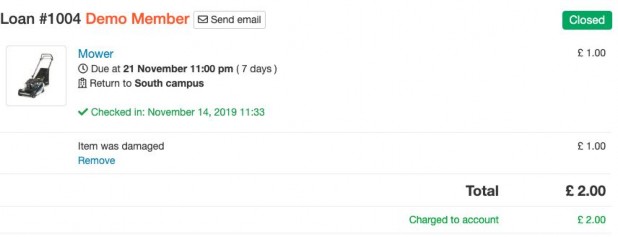 |
Additionally, you can take deposits which do not affect the member balance. See the deposits section of this guide for more detail.
Libraries who don’t charge a fee
If you don’t charge for your items, simply set the amounts to zero. To hide the fees across your member site, add this to your custom CSS at Settings » Member site:
.item-list-fee { display:none }
.item-fee { display:none }
Taking payments by card
If your account is on a secure server (you have a custom domain with us, such as https://borrow.myLibrary.com or you are using a secure lend-library.com domain by prior arrangement), then you can connect your account up to Stripe (www.stripe.com) to take card payments online. Lend Library does not charge any fee for processing payments with Stripe. All card details are sent directly to Stripe without going through Lend Library servers.
Administrators can choose a payment method whenever payment is taken, but members performing self-serve tasks can only make payment if you have Stripe enabled.
If you choose, you can set up a minimum payment amount for Stripe; perhaps you don’t want to use Stripe if payment is less than $1 so that fees don’t become excessive. Alternatively (or as well) you can choose to add a payment fee to all payments made via card.
Stripe can be set up to store a member’s card details for re-use. Either the member or a staff member can use previously stored cards, whenever further payment is required:
 |
Set up your payment choices on the Settings » General settings page.
Lending processes
Lending an item out (or reserving an item) as staff or administrator
-
Search for a member, or add them if they don’t yet exist, ensuring they have an active membership.
-
Click “browse as” and then find the item they want to borrow.
-
Click to borrow, and choose pickup and return dates.
-
Add item to basket. Continue adding more items if required. All items are to be picked up at the same time from the same site. If you need multi-site pickups, create multiple loans.
-
Edit prices if required.
-
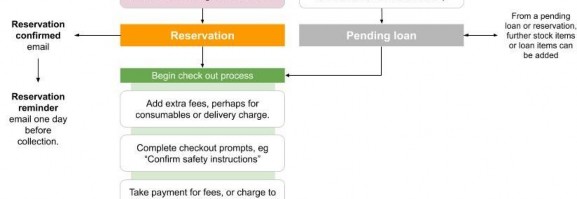
If the member is collecting items now, click check out. You’ll be taken to a “pending loan” which then needs to be checked out. If they are reserving for a future date, click reserve; the reservation will be created immediately.
-
On the check out screen, add any fees, any additional stock items or consumables.
-
Complete any check-out prompts.
-
If payment is required, take payment and choose the relevant payment method.
You can edit the payment amount on this screen, so if you wanted to add balance for future loans, you can do so. If the member balance is below zero, Lend Library will add that balance to the amount to be taken now as part of checkout.
When reservation or check out is completed, the member will receive a confirmation email.
Checking an item back in
-
Find the member’s loan using the admin toolbox on the member site; search by member name, loan ID or item name. Click the column headers to sort the table.
-
Add any fees required.
-
Click the “check in” button by the item that is being returned. You can return items on a multi-item loan at separate times, or all at once.
-
To return all items on a loan, tick the items you want to return.
-
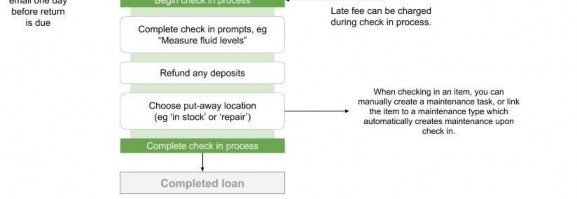
Choose the check in location, and add any notes if you need to.
-
If the item needs maintenance, choose a maintenance type.
-
Complete any check-in prompts.
-
Add a fee if you need, and then complete check in.
Extending a loan
If a member wants to keep an item for a little longer, you can change the return date.
-
Open the loan.
-
Click “choose a new return date” for the relevant item.
-
Select a new date. If you need to change the time, click the time in the popup screen.
-
Add any extra fees, or set the fee to zero if you don’t want to charge anything.
-
Optionally also take payment for the fee. You can take payment by card here if you have Stripe connected.
-
Confirm. The member will receive a confirmation email, and a note will be added to the loan.
Adding an extra fee
A fee can be added to a loan at any time, using the “add a fee” box on the loan edit screen. The fee is put directly onto the member account. If the loan is not yet checked out, then a payment can be taken for the fee amount as part of the checkout process. If the loan is checked out, then you would need to use the “add money” workflow to take payment for the fee.
Deposits
If an item has been set to require a deposit, then this amount must be paid when the item is checked out. As staff or admin, you can edit the deposit amount before confirming checkout.
When checking the item back in, you will see a notification that a deposit is due to be refunded back to the member. If you are going to refund it, then click the button and follow the process. If you are not going to refund the deposit, just leave it as-is and add a note to the loan to say why.
Self serve
You can set up your system to allow members to check items out and in themselves; see Settings » Member site. As a separate setting, you can allow members to extend loans themselves. If payments are due, then you will need to have Stripe enabled for the member to pay online, otherwise the amount will be put onto their account balance, assuming that their membership type allows credit (has a credit limit).
You will receive notifications to your organisation email address.
Waiting list
Some libraries operate a waiting list system. If you would like to use this feature, turn it on at the bottom of Settings » General settings.
When an item is unavailable (perhaps it’s on loan, or is in a reserved location), a member can add the item to their waiting list. When the item is moved into an available location, or is checked back in from a loan, all the members waiting for that item will receive an email. There is no further action from Lend Library; the item is removed from their waiting list and it’s up to the member to decide whether they want to reserve it.
Postal loans
Lend Library can be set up for loans to be posted/shipped to members as well as collected.
At Settings » Loans & Reservations you can turn on postal loans; this will add a “delivery options” section to the basket and loan screen, where users or admins can choose to collect from a site, or have the items shipped.
Shipping fees
If you want to charge shipping fees, you can add the amounts into the settings screen. Shipping can be charged on a per-loan basis (one amount for the loan), or a per-item basis (ie X amount for each item on the loan). Or you can combine the two.
When a user is adding items to a basket which is set for delivery, the shipping price is shown in the delivery options. When the basket is confirmed (either for a reservation or a pending loan), a shipping item is added as a line with the shipping fee as its price. The shipping item is a service, automatically created for you when you activate postal loans. You can change its name and other parameters by editing the service; follow the link from the postal loans settings area.
Shipping address
Loans and reservations set for delivery will show the member’s address on screen. Any changes to the address on the contact record will be reflected immediately on the loan or reservation. Members can change their own address details by visiting their profile page.
Printable loan
To view the loan in a printer-friendly format, just click the print link at the top right of the loan screen.
Automation
Lend Library saves you time by sending automated scheduled emails for various tasks. Transactional emails (item checked out, item checked in etc) are always sent; there is no setting to turn this off.
You can edit the email templates at Settings » Email templates, if you are on Starter plan or above. Emails are sent “from” a Lend Library email address (hello@lend-library.com) with your organisation email address as the “reply-to”. On Business plan, you can set up your own outbound email server.
Automated scheduled emails can be turned on or off at Settings » General settings in the Automation section.
Loan return reminders
An email is sent to members the day before their loan is due to be returned. If some of the items have already been returned, the email will only be sent for the due items.
Reservation reminders
The day before a reservation is due to be collected, an email is sent.
Overdue notifications
X days after an item has become overdue, an email is sent. You can choose how many days after the loan return date the email is sent, at Settings » General settings in the Automation section.
Membership expiry
You can choose to send an email to members on the day their membership expires. This contains a link for them to renew online (where they can also pay by card if you have Stripe connected).
Events
Lend Library can be used to manage your organisation events, using the same set of sites, opening hours, members and payment processing systems.
Events can be stand alone (unrelated to borrowing time slots and loan pickup/return), or they can be an extended version of custom opening hours, which will show on the item borrow calendar. Choose whether the event shows on item calendars when editing the event:
 |
Event listing
You can choose to show events on your member site, as a calendar. Customise the content at the top of the events page at Settings » Events.
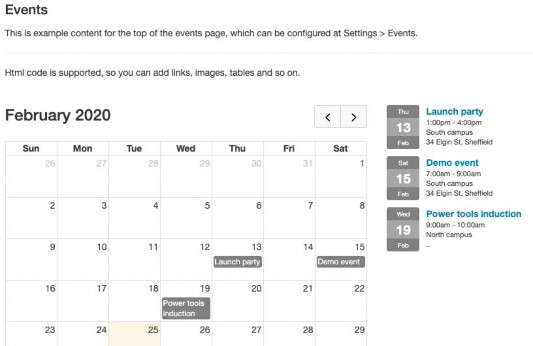 |
When a user clicks on an event, the event details show in a popup where they can book (if the event allows attendees) or check in (if the event does not have a cost and there are attendee spaces left):
 |
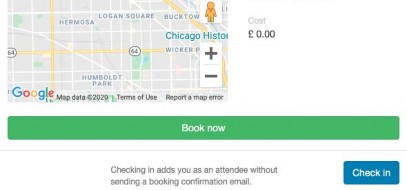 |
Attendees / selling tickets online
To allow the public to book onto events, choose “allow self serve booking” when creating an event. If there are places left on the event, or there are unlimited places, they will get a green button to book on the event details screen.
If payment is due, a payment form is shown on the event screen. As with other payment processes, staff and admin can choose a payment method, but members must pay by credit or debit card via the Stripe integration.
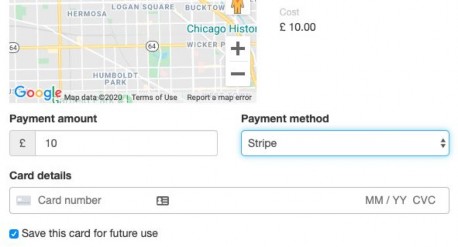 |
Staff and administrators can always book people onto events, regardless of the maximum number of attendees you have set for the event, and regardless of whether self serve booking is turned on.
The fee for each attendee can be edited on the event admin page. If an attendee needs to pay extra, then you can record payment taken via this screen, and take payment by card if you have the Stripe integration activated.
When someone is booked onto an event (either self-serve, or by an admin), they receive an email confirmation. The booking confirmation email can be configured in the same way as other email templates (subject, header and footer). See Settings » Events.
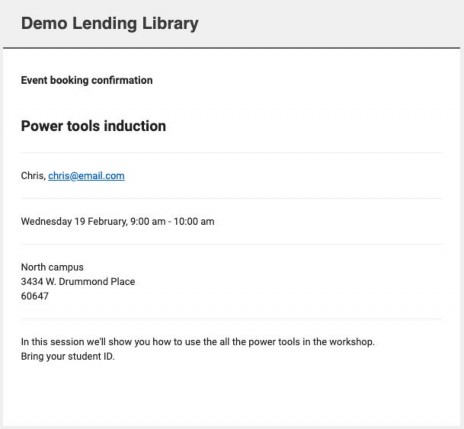 |
A copy of the booking confirmation email is also sent to your organisation email address.
Checking in
If an event has unlimited members, you can use Lend Library to record attendees; to track which members have turned up at the event. Just ask them to sign in (often on their phone), open the event screen and click “check in”. They will be added as an event attendee.
Kits
Kits are used when you lend a range of items together in one package. The kit components are normal loan items, combined into a separate item called a kit. You may choose to lend the components separately, or you may choose not to show them on your member site. Choose appropriately on the item edit screen for each component.
Here’s what a kit looks like on your member site:
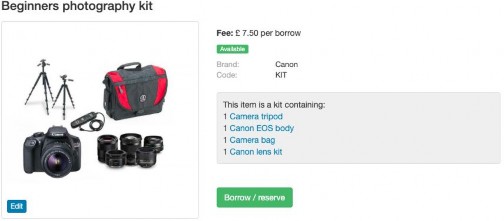 |
Setting up
First of all, create the components as loan items. Then choose to create a “kit item”. This has most of the fields of a loan item, but not all. There’s a new tab for “components”. Click to add components, and then search your item list for components to add.
Lending a kit
When a kit is added to the basket, Lend Library will add all the components of that kit as separate lines. The price charged (the fee) is determined by the fee of the kit, and the components are set to zero. If any of the components require deposits or check-out prompts, the process is the same as though you were lending the items separately:
 |
 |
Components where multiple group items exist
Using the example in the screenshot above; say you have lots of camera bags, all with the same name, which are interchangeable as far as kit components go. The kit defines specific item ID “1030” as the component for the kit, but what happens when a that item is already reserved by someone else? If you have “group items by name” turned on (Settings » Member site), then Lend Library will attempt to put another of the items with the same name into the kit. If a replacement is made, you’ll see a message:
 |
Since the item with the same name may not be located in the same site as you’re checking out from, it’s worth confirming that it’s the right item that’s been added. If you need to manually change the item, follow the next section in this guide.
Items not reserved by someone else but which are not currently available (perhaps in repair) will not trigger the replacement. The item is added as a component because it may have come out of repair by the time the loan or reservation is checked out. You’ll see “this item cannot be checked out” on the loan screen, and you can make a manual replacement if needed.
Swapping kit components
If a loan is “pending” or “reserved” then you can add further items to it. This means you can swap out an item that might not be in stock, maintenance is due, or is otherwise unavailable.
-
Open the loan or reservation, remove the offending item.
-
Click the “add loan item” at the bottom of the loan’s item list.
-
Browse for your replacement item.
-
Add to the loan as you would normally do. The pickup time is set for you.
Stock items / consumables
Stock items can only be sold to active members, in the same way that items can only be loaned to active members.
Setting up
Use the create item menu to add a new stock item
-
Enter item details and save the item
-
Click “Manage inventory” to add stock quantity to a chosen location. To add stock to multiple locations, do this process multiple times.
All items will show on the member site for admin and staff. You can hide stock items from members by unticking the checkbox on the item edit screen.
Selling an item as part of a new loan
-
When you are browsing to add items to basket, you can find stock items too. Instead of following the usual calendar process for adding loan items, you have the option to add a certain quantity of the stock item directly to the basket.
-
The price can be edited in the basket. If you need to change the quantity, remove and re-add the item (or change the quantity later when the loan is created).
-
Check out as normal.
You can create a loan with only stock items, or add stock items to a loan that contains other lent items.
Adding items to a previously created reservation
If a member creates a reservation, you can add consumables later when they come to check out. Click the “add stock item” button on the reservation, browse or search for your item and add to the loan.
You cannot add stock items to a reservation (since a reservation is for the future, when there is no guarantee that the stock items will be available). This feature is under review; we might choose to allow reservations to have stock items (but the stock will not be reserved)
Updating inventory
When you receive new items into stock, go to the item edit screen and click “Manage inventory”. If you have to remove stock because it’s damaged, or move items from one location to another, use this manage inventory screen.
How to sell an item that’s currently on loan
If a member chooses to buy an item that they have on loan, you can convert it to a stock item. From the item check-in screen, click “Convert to stock item”. This will:
-
Convert the item into a stock item, which means it cannot be lent again.
-
Set stock levels to zero.
-
Close the loan, if there are no more items to check in.
If you want to take payment for the item, you will need to:
-
Add a fee to the loan, call it “Sold item X” perhaps.
-
Go to the ‘add credit’ screen for the user, to take payment.
Services
You can create “service” items which can also be added to loans, much like stock items; but inventory is not tracked. You don’t have to check service items in or out.
They can be useful for fees that you might want to add to a loan without immediately charging to account (which is what happens with other fees added via the loan screen). Perhaps a repair charge, or a shipping cost. Using service items makes it easier to report on, too.
To create a service item, just use the menu on the left side of admin screens.
Maintenance and servicing
Introduction
Lend Library includes powerful maintenance and service/repair features, to help you stay in control of lots of items and work.
 |
The maintenance module revolves around maintenance types. Here we have three example types of maintenance (you could call them “service schedules”) :
 |
Some maintenance types might apply to lots of items (such as the annual electrical test), or perhaps just one item (such as the lawnmower safety check). Or you can create a maintenance type which is just used for general work; you give a description of what’s needed when creating the maintenance task.
Assigning maintenance to items
You can automate the creation of maintenance tasks by assigning a maintenance type to an item, on the item edit screen. Once you have saved the item, you have the option to schedule the maintenance:
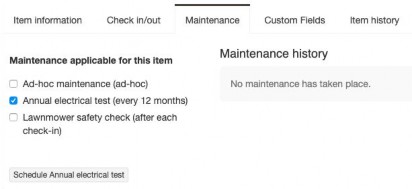 |
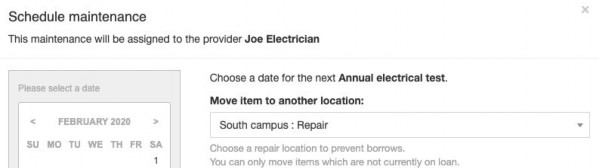
Scheduling maintenance
When scheduling the maintenance, you choose the date, and a new location if you want to take the item offline and place it into a repair location. You can also add notes at this point. If the maintenance type has been given a “provider”, then you can send them an email at the same time to let them know they have work to do.
 |
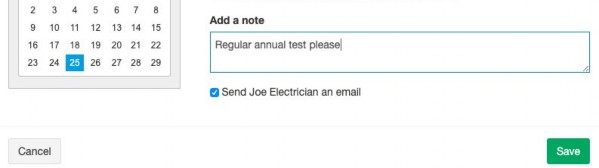 |
Here’s what the email looks like:
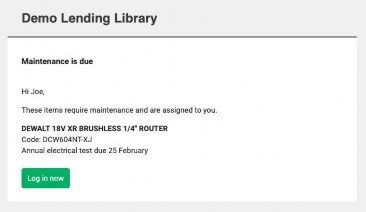 |
There are 4 ways to schedule maintenance:
-
Create an ad-hoc maintenance when moving an item from one location to another:

-
Using the “schedule maintenance” button on the item edit screen.
-
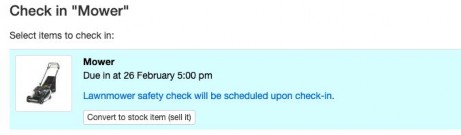
Auto-create a single maintenance after each item check-in.
-
Auto-schedule every X months. For this last case, a tickbox will be provided on the maintenance screen so that when one maintenance is complete, the next one is created:
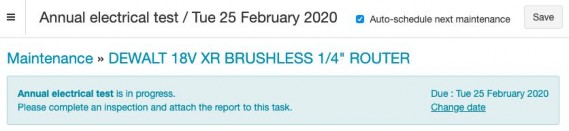 |
Performing the maintenance
When you open the maintenance task (from the email, the maintenance report, or a warning on an item when maintenance is overdue), you will see that the maintenance is not started. You can “start maintenance” to set it in progress without completing it, or you can progress straight to completing it. A cost can be added, if required, and any relevant files can be uploaded. Perhaps a safety inspection certificate, as in this example:
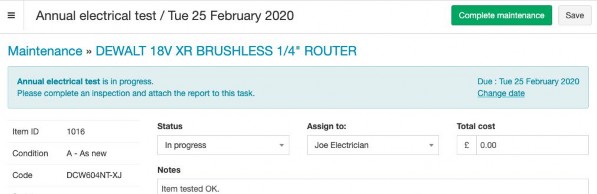 |
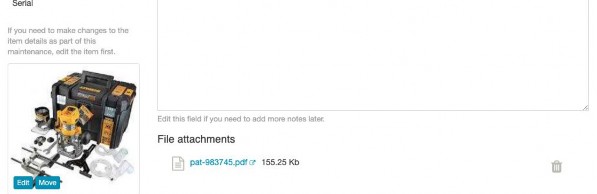 |
Note that if an item has been moved to a repair location for maintenance, it’s not automatically moved back into an available location after the maintenance is complete. This needs to be done manually.
Other features
You can prevent items from being borrowed if maintenance is overdue. Set this up when creating or editing the maintenance type. It applies to admins as well as members. You could use this feature to prevent loans if your insurance is invalid if the item has not been regularly maintained.
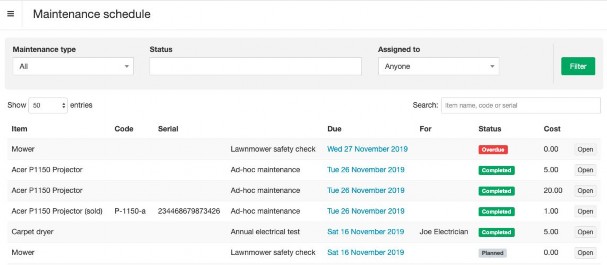
Reporting
The admin dashboard gives an overview of your operation:
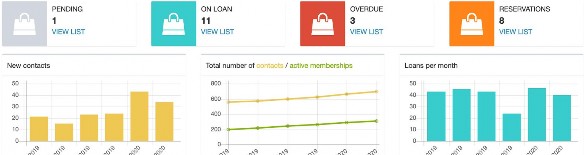 |
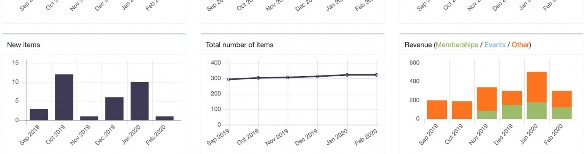 |
And then there are a number of detailed reports which can be exported to CSV for any other reporting you might want to do:
-
Loans by status
-
Loans by member
-
Loans by item
-
Loan rows
-
Non-loaned items
-
Payments
-
Memberships
Most reports can be filtered, sorted and customised. All income (loan fees and extensions, late fees are separated) and expenses (purchase price and maintenance costs) are shown, so you can see which items are working well and which aren’t.
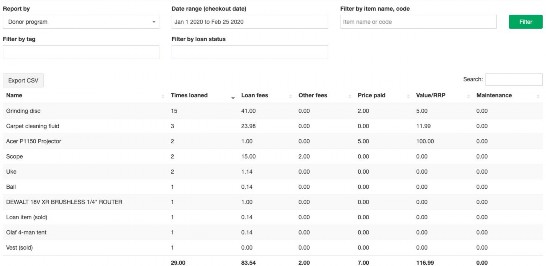 |
Billing and subscription
About billing
Lend Library is paid for on a monthly basis, using a credit or debit card. At the end of your free trial, your account will be restricted and you will need to upgrade to a plan. There is a free plan for smaller libraries to get started with.
When moving from the free trial to a paid plan, your data is retained; it’s the same account.
You can upgrade or downgrade at any point. Changing plans will cancel the previous plan, and start the new plan on the day of upgrade. No refunds are given for part-used months of the previous plan.
If your Library cannot pay by card, you can pay by invoice and bank transfer; 12 months at a time.
White labelling
The Business plan allows you to “white label” the software, which means you remove most Lend Library branding. You would set up your own domain (eg https://borrow.myLibrary.com).
